
Ford forums - all models - 1998 Ford Contour timing belt slips
- Home
- Forum
- Cars
- Ford forums all models
- 1998 Ford Contour timing belt slips
Forum -> cars -> Ford forums - all models
My brother is trying to replace the timing belt on the 2.0l engine of his 1998 Ford Contour (fo..
My brother is trying to replace the timing belt on the 2.0l engine of his 1998 Ford Contour (for the third time).
He has followed the directions at http://www.aa1car.com/library/2004/us70444.htm but the timing belt slips off the cam gears after driving just a few blocks.
He took it to a second rate (he thinks) mechanic who fixed it, but the same thing happened.
The mechanic told him the car should have had a timing belt shim. What are they missing?
Hi, the timing belt info shown in your link is for a SPI Single Overhead Cam engine.
The 2.0 in the contour should be a DOHC cam. Sounds like you are not getting the timing belt tension correct.
Never ever heard of a timing belt shim in all my years of turning a wrench. Main thing to check and replace when working on the timing belt is the timng belt idler & tensioner pullies, the bearings like to fail and can cause the belt to jump.
Is there a correct online set of directions he could refer to?
I imagine you know the disassembly process at this point so I will post the installation process:
The instructions are a little vague but I will say this, The valve cover needs o be removed and a flat bar installed in the back of the camshafts to hold the camshafts in time. You can only do this one way so it should be easy not to time the engine 180 degrees out the crank pulley I turn so the keywy is at he 12 o clock position and I mark it wih some white out to make sue it is in the correct position after adjusting the tensioner.
NOTE: Rotate the crankshaft clockwise. Rotate the crankshaft to TDC on cylinder No. 1
NOTE: Cylinders No. 1 and No. 4 are at TDC when the Woodruff key points straight up. Remove the blanking plug, completely screw in the special tool and auto-align the crankshaft to TDC. Position cylinder No. 4 to ``valves overlap" and install the special tool.
Hold the camshafts by the hexagon using an open-ended wrench and turn them in the direction of engine rotation.
Slide the special tool onto the ends of both camshafts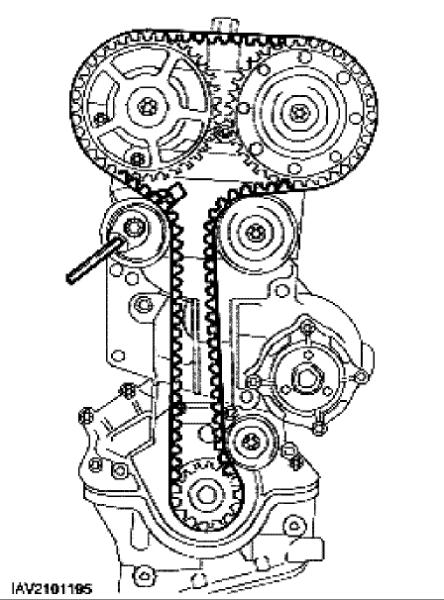 CAUTION: Do not kink the timing belt (do not bend the timing belt less than a diameter of 35 mm). CAUTION: Do not rotate the crankshaft; as necessary check that it is still resting against the timing pin. NOTE: Design with lower idler pulley shown (built up to 06/1999). NOTE: The lug of the belt tensioner should not be hooked in the sheet metal cover during timing belt installation. Position a new timing belt in place.
Starting from the crankshaft timing belt pulley and working counterclockwise, position the timing belt in place while keeping it under tension
CAUTION: Do not rotate the crankshaft; as necessary check that it is still resting against the timing pin. NOTE: Design without lower idler pulley shown (built 06/1999 onwards). NOTE: The lug of the belt tensioner should not be hooked in the sheet metal cover during timing belt installation. Position a new timing belt in place.
Starting from the crankshaft timing belt pulley and working counterclockwise, position the timing belt in place while keeping it under tension.
NOTE THERE IS NO PEG INSTALLED IN MY INSTALLATION.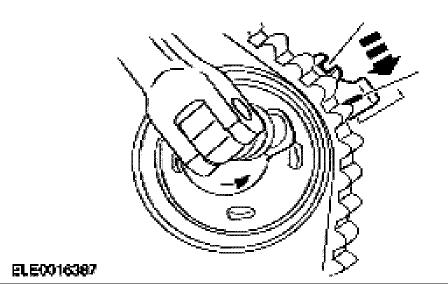 NOTE: Incorrect timing belt tension will cause incorrect valve timing. Pre tension the timing belt.
Rotate the tensioner locating tab counterclockwise and insert the locating tab into the slot in the rear timing cover.
Position the hex key slot in the tensioner adjusting washer to the 4 o'clock position.
Tighten the attaching bold enough to seat the tensioner firmly against the rear timing cover, but still allow the tensioner adjusting washer to be rotated using a 6mm hex key.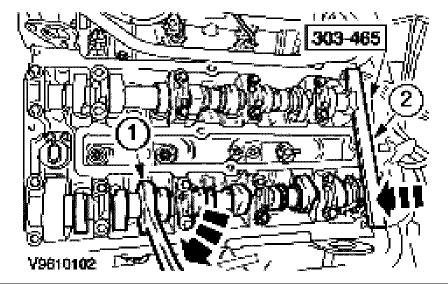 CAUTION: Tension the timing belt, working counterclockwise. Using the hex key, rotate the adjusting washer counterclockwise until the notch in the pointer is centered over the index line on the locating tab (the pointer will move clockwise during adjustment).
While holding the adjusting washer in position, tighten the bolt.
Once the tiing belt tension is set, remove the flat bar frm the back of the camshafts, turn the engine over by hand and recheck belt tension, reinstall est of the front engine componets and road test.
Thank you for using CRXSi.Com! Please ask for more detailed information. Please leave some positive feedback!
Accepts & bonuses are appreciated
Whoo hoo! Thanks.
Forum -> cars -> Ford forums - all models
![]()
![]()


